Wednesday, December 19, 2012

ADF Mobile: Displaying error, warning, info messages


Every application will have scenarios to display different kinds of error and information messages on the screen. ADF Messages on mobile devices are displayed as a popup with a single close button

This demo application RedstackLogicMessagesDemo.rar has simple code to throw different kind of messages on to the screen when some buttons are clicked.

to create an error that is thrown onto the screen you can throw a new oracle.adfmf.framework.exception.AdfException. This lets you throw either of  FATAL, ERROR, WARNING, INFO messages on to the screen.

for e.g. to show messages you can create exceptions like this


image


Below is how messages will look in the mobile


image
imageimage
image


Tuesday, December 18, 2012

Creating a weblogic domain and a cluster in windows


1. Go to Configuration Wizard
image
2. Select Create new Domain
image
3. Select required technologies and click next
image

4.  Give a Domain Name and click next
image

5. give a Username and password and click next
image
6.Select the required mode and click Next
image

7. If you are not creating a MDS Schema click next . If it asks for a password, Check the box and enter some text in the password box and uncheck the box and click next.
image
8. hit next.
If you get a warning, click OK
image

9. select the required setting you want to configure and click next.
image
10. You can leave the defaults here
image


11.
image

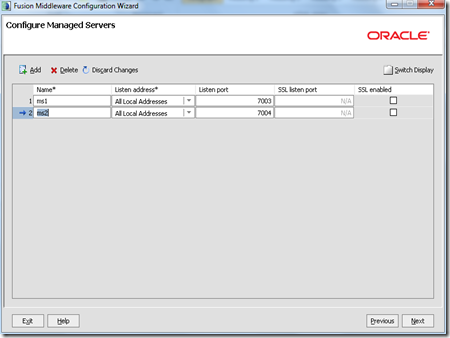
12. Create the managed servers for the cluster
image

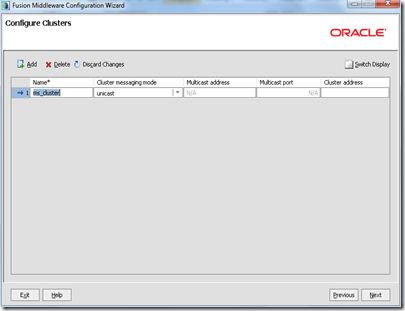
13. give a cluster name . If required, You can also setup multicast here. hit next
 image

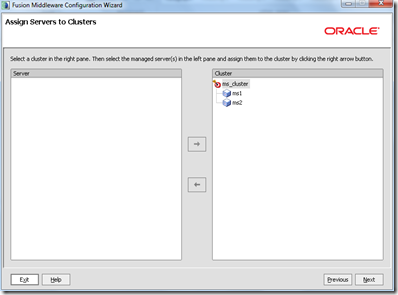
14.
Shuffle both the managed servers created in step 12 to the cluster.
image
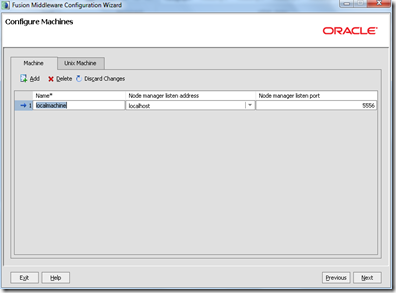
15. give a machine name
 image


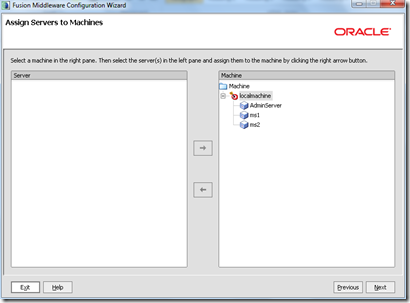
16.

Add the server you want to configure on this machine. hit next
image
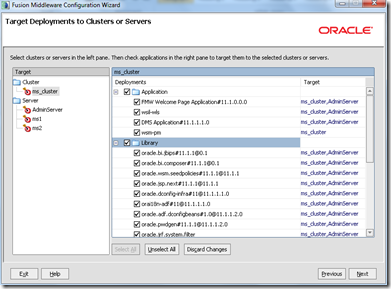
17. Add the libraries and application you want to configure on this servers
image

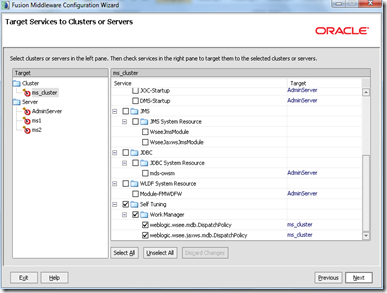
18.  Select required services and hit Next.
image
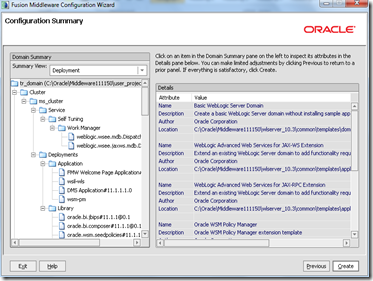
19.  Hit Create

image

ADF Mobile : Consuming a Restful service


Simple way to consume a restful service in ADF Mobile is to create a URL Service Data Control.

I have created two applications. The first one RestServices.rar is a simple restful service which does a begins with search of Employees. The second one RedStackMobileRestfulDemo.rar is a ADF mobile application to consume the restful service.

First I create an XSD locally in the project to represent the response. We can also refer this remotely. But this will cause the mobile application to make a call every time the application runs.


Employees.xsd
<?xml version="1.0" encoding="windows-1252" ?>
<xs:schema attributeFormDefault="unqualified" elementFormDefault="qualified" xmlns:xs="http://www.w3.org/2001/XMLSchema">
  <xs:element name="employees">
    <xs:complexType>
      <xs:sequence>
        <xs:element name="employee" maxOccurs="unbounded" minOccurs="0">
          <xs:complexType>
            <xs:sequence>
              <xs:element type="xs:string" name="department"/>
              <xs:element type="xs:byte" name="employeeId"/>
              <xs:element type="xs:string" name="name"/>
            </xs:sequence>
          </xs:complexType>
        </xs:element>
      </xs:sequence>
    </xs:complexType>
  </xs:element>
</xs:schema>


We can now create a URL Service Data Control. Below are the steps to create a URL service data control

1

image

2 give the
URL Endpoint : get url without the query
Source: give the query with param values in ## ## as illustrated below

image

3 Here it mandates the query to have a defaultvalue

image

4 Select the Employees.xsd and finish

image

You can now see the data control in the data control pallet

image


You can now drag and drop  loaddata Action into the amx page as ADF Mobile Parameter Form . Drag and drop employee as ADF Mobile List View.

image

image


You can now preview and run the app. For reference you can also download the source code

Saturday, December 15, 2012

Disable count query in ADF table


This can be done by RowCountThreshold = –1 in the iterator on the page definition

Note: To have a proper scroll behavior. This query should execute.  Scroll behavior will change. It will only scroll the range size.

JDBC Drivers / data source problems for Jdeveloper 11.1.2.


When you upgrade to Jdeveloper 11.1.2.x you might face multiple problems when you are using jdbc data sources as you configured with the 11.1.1.x versions.
You might face problems like this

Caused by: java.lang.AbstractMethodError: com.ibm.as400.access.AS400JDBCConnection.isWrapperFor(Ljava/lang/Class;)Z
    at weblogic.jdbc.wrapper.JDBCWrapperImpl.isWrapperFor(JDBCWrapperImpl.java:202)


Solution:
Weblogic 11.1.2 supports JDBC4.0 by default. So All JDBC drivers should be
JDBC 4.0 compatible.

more about JDBC 4.0 refer http://today.java.net/pub/a/today/2007/04/10/whats-new-in-jdbc-40.html

JDBC 4.0 Drivers
SQL Server : Download  JDBC 4.0  driver from http://www.microsoft.com/en-us/download/details.aspx?id=11774  and use sqljdbc4.jar in your classpath
JTOpen / JT400:  Download JDBC 4.0 driver from http://sourceforge.net/projects/jt400/files/JTOpen-full/7.8/jtopen_7_8_jdbc40_jdk6.zip/download

jars in Domain/lib not Pickedup
Weblogic 11.1.2 doesn’t automatically pick up jars from the the domain lib directory. To fix this, you have to set the class path in the weblogic start command. this can be done in many ways. One way is to edit bin/startWebLogic.cmd and add a line set
CLASSPATH=%SAVE_CLASSPATH%;path to your driver;

Weblogic Bridge for IBM MQ Series(Running on AS400 / iseries / Mainframe) Part 2


6. Create Local Queues


You need to create local queues in weblogic
refer my previous posts on how to create local queues


Configure MQ series Bridge in weblogic


7. Install jms-xa-adp.rar in weblogic.


This is an XA adapter for weblogic and is required for guaranteed delivery. This comes along with weblogic installation and is available in server/lib directory. Install this as a .rar file and dont unzip this.
to deploy this go to weblogic console. domain - > deployments - > install.
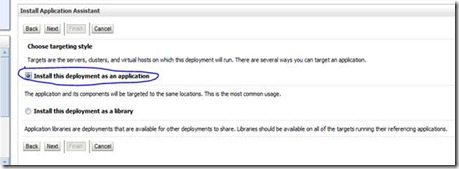
clip_image002
select the jms-xa-adp.rar and on the choose target style. select "Install this deployment as an application" as shown above and continue the rest of the installation.
 
7. Create JMS Bridge destinations
 
You need to create a source and target destination. In our case local queues are source and  MQ series is remote


8. Create Source Destination

 
a.  Select JMS Bridge Destinations and click New
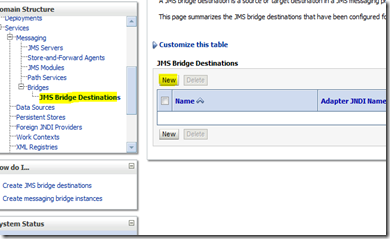
image
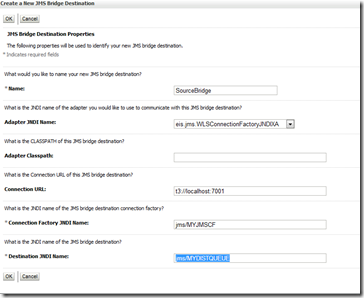
b. fill in the following details and click OK
Name: Source Bridge
Adapter JNDI Name: eis.jms.WLSConnectionFactoryJNDIXA
Classpath:
Connection URL: t3://localhost:7004,localhost:7003  (ignore the image)
*Connection Factory JNDI Name: jms/MYJMSCF  (from  step 5 – > d  http://rohith-oracle.blogspot.com/2012/10/creating-file-based-jms-queue-on_9.html)
*Destination JNDI Name: jms/MYDISTQUEUE       (Local distributed Queue JNDI  given when creating a file based jndi as in step 6 – > d  http://rohith-oracle.blogspot.com/2012/10/creating-file-based-jms-queue-on_9.html )
Destination Type: QUEUE
 
image
 

9. Create a Target Destination

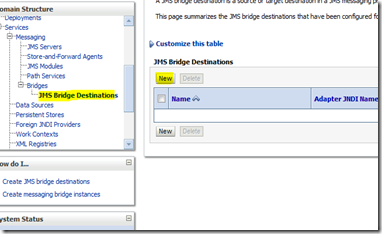
a.  Select JMS Bridge Destinations and click New
image


b.  Enter the following details and click OK
*Name:  TargetBridgeDestination
Adapter JNDI Name: eis.jms.WLSConnectionFactoryJNDIXA
Adapter Classpath:
Connection URL: file:/C:/jmsbindings/    (As given when creating initial context in Step 3 –> b)
Initial Context Factory: com.sun.jndi.fscontext.RefFSContextFactory
*Connection Factory JNDI Name: MQCF  (As given when creating initial context in Step 4 –> b)
*Destination JNDI Name: TestQ   (As given when creating initial context in Step 5 –> b)

image


c. Click on the currently generated destination
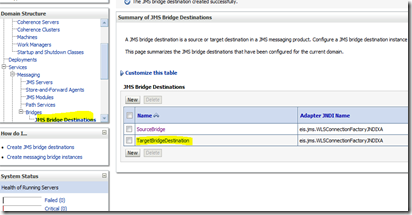
image

d. Change the initial context factory to com.sun.jndi.fscontext.RefFSContextFactory
click ok.
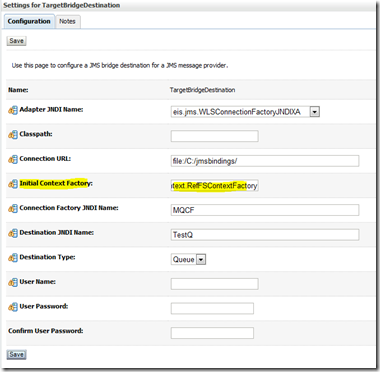
image


10. Create the Bridge

a. Select bridges and new
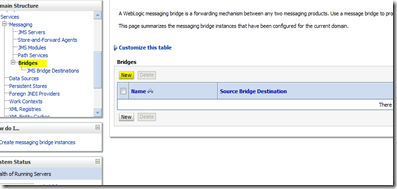
image
b. Give a name , Quality of service and Started Check box. Click next
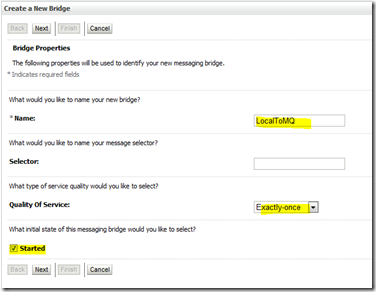
image
c. Select  Source Bridge Destination and click next
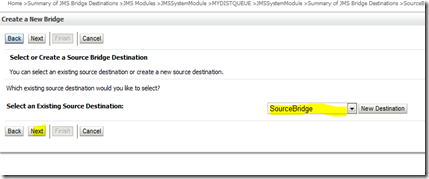
image

d. Select source provider.  Since the source is a weblogic queue we selected Weblogic 7 or higher
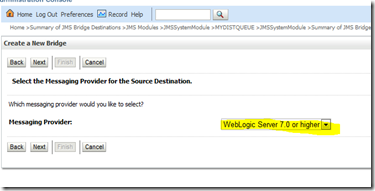
image

e. Select the bridge destination.
image
f.  Since the remote queue is MQ Series . Select Other JMS
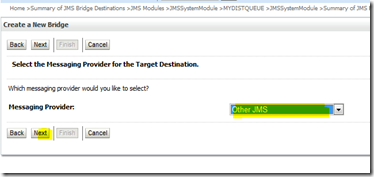
image

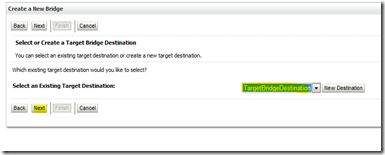
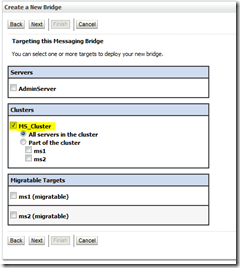
g. Select the target
image

h. click next and finish


Wednesday, October 24, 2012

Webcenter Spaces Twitter feed from multiple sources


A. Create a Twitter List

1. To combine Tweets from multiple sources. You can create a List. Login to your account and select lists

image

2. Click on Create List
image
3.  Give a name and set the appropriate privacy
image
4. Add all the people you want to follow in the list
image

B. Create the Code to use twitter


There are multiple ways to actually generate the code to display the tweets. I will demonstrate two
1. First  Approach
Use a Twitter List Widget
a. Go to Twitter Settings
image
b select widgets and click new
image
c. Select the lists tab and the list. You have to give the URL  you want to use this widget in. This widget will only work in the given domains or localhost (you don’t have to put in localhost in the domains).
click create Widget
image
d. Click Save Changes .
It generates the code you can use to copy into your website.

image


2. Second Approach
For animated tweets Use twitter’s widget.js javascript Code and change the twitter name and list name in the code below and use this code directly in the website.
 <script charset="utf-8" src="http://widgets.twimg.com/j/2/widget.js"></script>
<script>
new TWTR.Widget({
  version: 2,
  type: 'lists',
 
  rpp: 4,
  interval: 6000,
  width: 350,
  height: 300,
  theme: {
    shell: {
      background: '#f2f2f2',
      color: '#c2c2c2'
    },
    tweets: {
      background: '#f2f2f2',
      color: '#293d50',
      links: '#627770'
    }
  },
  features: {
    scrollbar: false,
    loop: true,
    live: true,
    hashtags: true,
    timestamp: true,
    avatars: false,
    behavior: 'default'
  }
}).render().setList('Twitter @name without @','list name').start();
</script>


C. Placing Twitter Code in webcenter Spaces


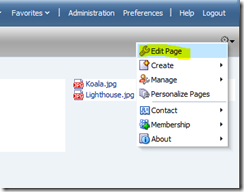
1. Click on Edit Page

image

2. Click on Add Content

image

3. Add HTML Markup (Depending on the ) and close

image

image

4. Edit the HTML Markup

image

5. Paste the code from one of the two approaches earlier and hit Ok.

image

6. hit save and close.

image


7. I used the script form the second method

image